首先推荐一个日常使用的服务器,目前特价配置仅需9.95元/每月,还是三网回程CN2线路。
链接是:https://868yun.com/act.php?url=1111
使用优惠码可以享受优惠,另外只有本站提供的永久8折优惠码:2023
更新
apt update
安装curl
apt install curl
安装v2ray
使用curl进行安装
bash <(curl -L https://raw.githubusercontent.com/v2fly/fhs-install-v2ray/master/install-release.sh)
输入vi /usr/local/etc/v2ray/config.json命令,编辑配置文件的内容为以下内容:
{
    "log": {
        "access": "/var/log/v2ray/access.log",
        "error": "/var/log/v2ray/error.log",
        "loglevel": "warning"
    },
    "inbounds": [{
            "port": 11055,
            "protocol": "vmess",
            "settings": {
                "clients": [{
                        "id": "27848739-7e62-4138-9fd3-098a63964b6b",
                        "level": 1,
                        "alterId": 0
                    }
                ]
            },
            "streamSettings": {
                "network": "ws",
                "wsSettings": {
                    "path": "/tech"
                }
            }
        }
    ],

    "outbounds": [{
            "protocol": "freedom"
        }
    ]}
启动v2ray服务
#启动并加入开机自启systemctl start v2ray;systemctl enable v2ray
安装nginx
执行安装
apt install -y nginx
新建网页目录
这里在假设是/root/www。
mkdir -p /root/www
新建首页
在/root/www目录下新建一个index.html文件,
vi /root/www/index.html
内容如下:
<!doctype html><html lang="en"><head>
    <meta charset="utf-8">
    <title>优米格-有事儿没事儿分享一下</title>
    <style>
        .container {
            width: 60%;
            margin: 10% auto 0;
            background-color: #f0f0f0;
            padding: 2% 5%;
            border-radius: 10px
        }

        ul {
            padding-left: 20px;
        }

        ul li {
            line-height: 2.3
        }

        a {
            color: #20a53a
        }
    </style></head><body><div class="container">
    <h1>感谢访问:</h1>
    <ul>
        <li>本站分享各类软件,方便大家获取使用!</li>
        <li>请勿请本站分享内容用来获利,大部分内容来自网络,凡是经本站分发的内容都经试用过,可放心安装!</li>
        <li>本站唯一网址:<a href="https://www.yomige.com/">https://www.yomige.com/</a>,谨防假冒!</li>
    </ul></div></body></html>
新建配置文件
注: 不同版本的nginx配置文件可能有区别,我的是nginx/1.18.0,配置文件/etc/nginx/sites-enabled/default。或者你的配置文件可能在/etc/nginx/conf.d/default.conf。
输入vi /etc/nginx/sites-enabled/default命令,编辑nginx配置文件为如下内容:
server{
    listen 80;
    server_name v1.xxxx.com;
    index index.html;
    root /root/www/;}
这里你可能需要将
/etc/nginx/nginx.conf中第一行user www-data改为user root,即当前用户。
启动nginx服务
#启动Nginx并设置为开机自启systemctl start nginx;systemctl enable nginx#查看nginx启动状态systemctl status nginx
在浏览器里访问v1.xxxx.com,如果正常则说明nginx配置没问题,这是是没有加密的,不带HTTPS的网址:http://v1.xxxx.com。
安装certbot并申请ssl证书
详细的申请证书流程参考: certbot instructions – Nginx on Debian 10 (buster)。具体如下:
安装snapd
apt install -y snapd
确保snapd为最新版本
snap install core; snap refresh core
安装certbot
snap install --classic certbot
创建软链
ln -s /snap/bin/certbot /usr/bin/certbot
申请证书
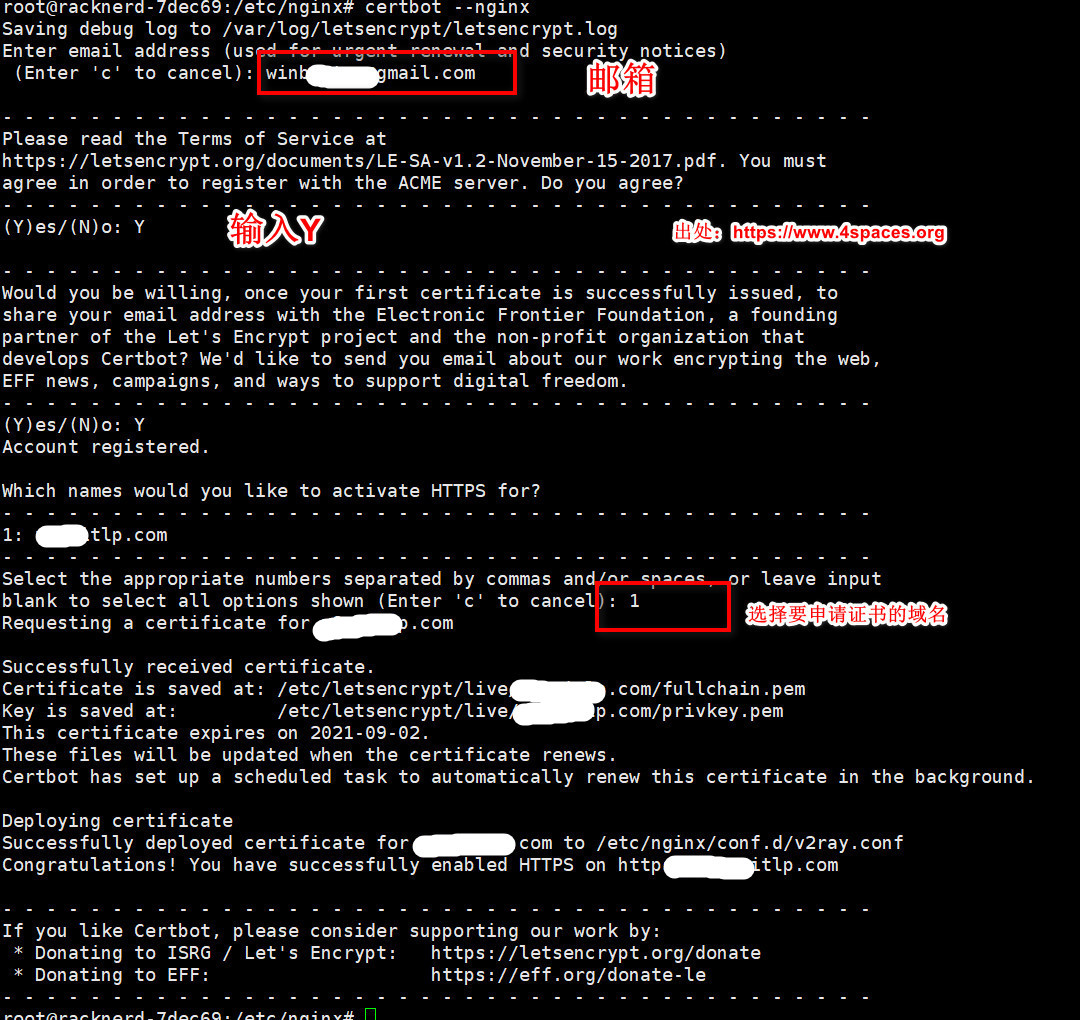
运行certbot --nginx开始申请证书,如下:
稍等一会,会提示证书安装成功! 你会发现nginx的配置已经更改,我的/etc/nginx/sites-enabled/default文件被自动修改为以下内容:
server{
    server_name v1.xxxx.com;
    index index.html;
    root /root/www/;

    listen 443 ssl; # managed by Certbot
    ssl_certificate /etc/letsencrypt/live/v1.xxxx.com/fullchain.pem; # managed by Certbot
    ssl_certificate_key /etc/letsencrypt/live/v1.xxxx.com/privkey.pem; # managed by Certbot
    include /etc/letsencrypt/options-ssl-nginx.conf; # managed by Certbot
    ssl_dhparam /etc/letsencrypt/ssl-dhparams.pem; # managed by Certbot}server{
    if ($host = v1.xxxx.com) {
        return 301 https://$host$request_uri;
    } # managed by Certbot


    listen 80;
    server_name v1.xxxx.com;
    return 404; # managed by Certbot}
此时,在浏览器里访问v1.xxxx.com已经是https开头的了,地址:https://v1.xxxx.com。
添加v2ray转发
将/etc/nginx/sites-enabled/default更改为以下内容:
server{
    server_name v1.xxxx.com;
    index index.html;
    root /root/www/;

    listen 443 ssl; # managed by Certbot
    ssl_certificate /etc/letsencrypt/live/v1.xxxx.com/fullchain.pem; # managed by Certbot
    ssl_certificate_key /etc/letsencrypt/live/v1.xxxx.com/privkey.pem; # managed by Certbot
    include /etc/letsencrypt/options-ssl-nginx.conf; # managed by Certbot
    ssl_dhparam /etc/letsencrypt/ssl-dhparams.pem; # managed by Certbot

   ## 添加这部分内容,22055对应/usr/local/etc/v2ray/config.json 里面inbounds端口
   ## /tech客户端配置的时候需要,对应/usr/local/etc/v2ray/config.json streamSettings里的path
    location /tech {
        proxy_redirect off;
        proxy_pass http://127.0.0.1:11055;
        proxy_http_version 1.1;
        proxy_set_header Upgrade $http_upgrade;
        proxy_set_header Connection "upgrade";
        proxy_set_header Host $http_host;
    }}server{
    if ($host = v1.xxxx.com) {
        return 301 https://$host$request_uri;
    } # managed by Certbot


    listen 80;
    server_name v1.xxxx.com;
    return 404; # managed by Certbot}
然后运行systemctl restart nginx重启nginx。
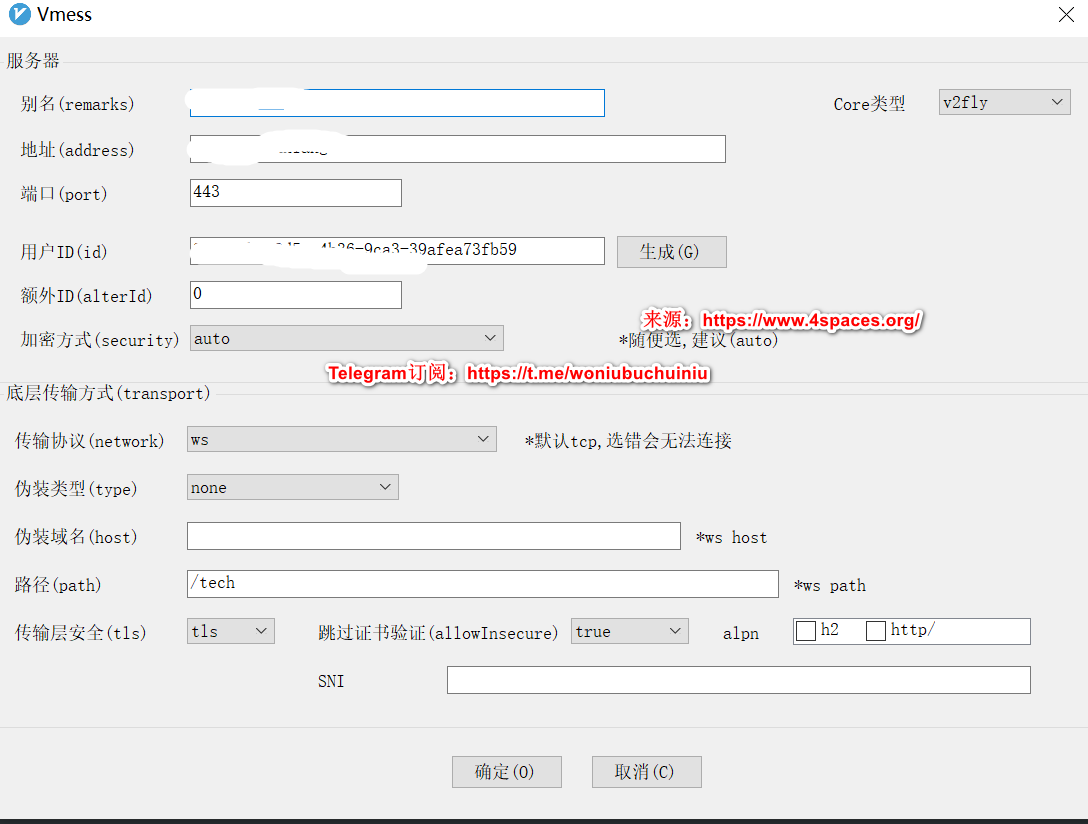
客户端v2rayN配置
大体截图:


0 留言